Departmental Check Deposit Instructions
All cash should be kept in a secured location that can only be accessed by authorized personnel. Some examples are: a locked drawer, locked filing cabinet, a safe or lockbox.
Note: The DEPOSIT OF CHECKS, CASH, AND CREDIT CARD RECEIPTS policy states that all revenue must be deposited on the same day it is received. Holding onto checks until an event is over or until you have several checks to deposit is not in compliance with this policy. There is increased risk of loss and potential for checks to be stale dated and not suitable for deposit.
Checks received by departments should be mailed to a designated lockbox at PNC Bank. A copy of the cash departmental journal entry prepared by the department must be mailed with the checks. The lockbox address is:
GW Departments Lockbox
P.O. Box 826015
Philadelphia PA 19182-6015
Pre-addressed blue envelopes are available for mailing your deposit. These envelopes are available at the Student Services Hub or you may request envelopes be sent to you by emailing benriquez![]() gwu [dot] edu (benriquez[at]gwu[dot]edu). Instructions for preparing check deposit journal entries are available and UAS staff are also available to assist you. Please contact sbgamboa
gwu [dot] edu (benriquez[at]gwu[dot]edu). Instructions for preparing check deposit journal entries are available and UAS staff are also available to assist you. Please contact sbgamboa![]() gwu [dot] edu (sbgamboa[at]gwu[dot]edu) or benriquez
gwu [dot] edu (sbgamboa[at]gwu[dot]edu) or benriquez![]() gwu [dot] edu (benriquez[at]gwu[dot]edu).
gwu [dot] edu (benriquez[at]gwu[dot]edu).
The blue deposit envelopes with your checks and a copy of your cash departmental journal entry should be forwarded to mail services by dropping your deposit in the yellow intercampus mail box at the Student Services Hub, or by putting your deposit in the intercampus mail. If your deposit is in the pre-addressed blue envelope, your department will not be charged for postage.
Please note that the following checks should be re-routed to the proper department for handling:
- All gifts must be delivered to the Advancement Office for deposit.
- All deposits reimbursing a research grant must be delivered to Grants & Contracts Account Services (GCAS) for deposit.
Preparing the Deposit
- Select a GW GL Entry Responsibility.
- Click on the “Top Hat” in the blue tool bar.
- Select GW GL Entry 0-All from the drop down menu.
- Click “OK”.

- Double click: Enter Journals.

- Click: New Journal.

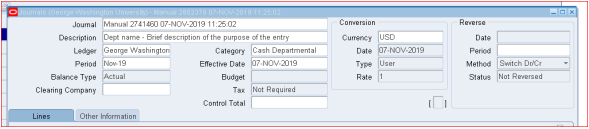
- Enter Description information.
- The description line should contain your department name and a brief description of the entry.
- Do not overwrite or enter any information on the Journal line, this will populate with the batch information for accounting purposes.
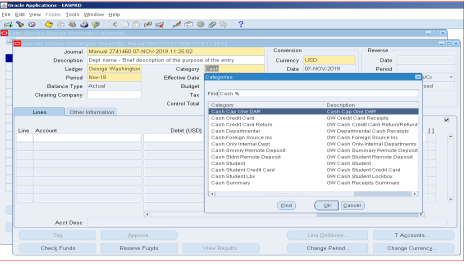
- Click in the Category field.

- Type the word “Cash” in the Category field and press the Tab key.
- A list of Cash categories will populate.
- Click on “Cash Departmental”.
- Click on “OK”.

- The journal header is complete. You may enter the line information for your check deposit.
- The first line Enter 1, press Tab.
- Click on the 3 dots to bring up the alias box, type in “Cash” and “OK”.
- Highlight “Cash Dept” and click on “OK”.

- The full accounting string for the cash account (Departmental checks) will auto populate.
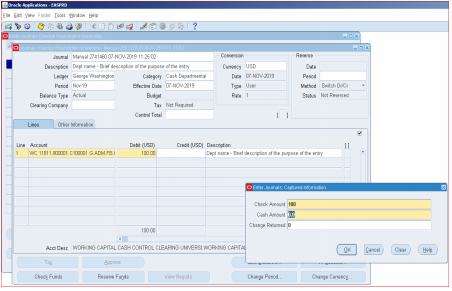
- Enter the total amount of the deposit in the Debit column.
- Tab over, your Description line will auto populate for your header.
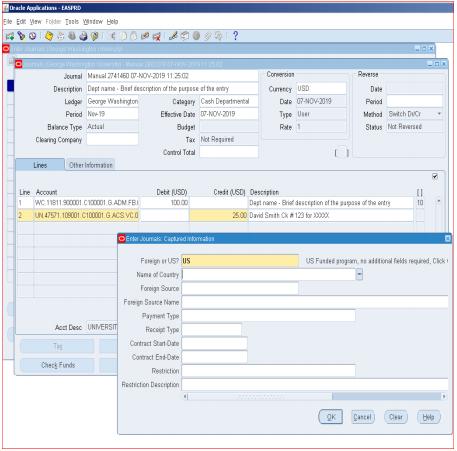
- Tab to the last column the following will pop up, “Enter Journal: Captured Information”.
- Enter the Total of the checks.
- Cash amount is $0.00 (These steps are for check entry only).
- Change return is $0.00.
- Click “OK”.

- You are ready to enter your revenue stream on the subsequent lines for your check deposits. This may be done as a single line or multiple lines referencing each check individually.
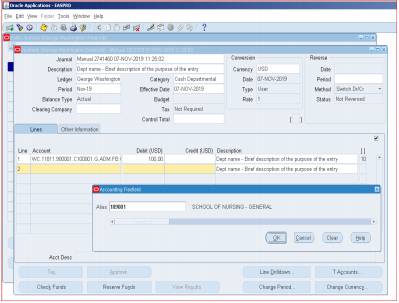
- Enter 2 on the next line, Tab over.
- Click on the 3 dots to bring up the alias box.
- Select your departmental alias.
- Click on “OK".

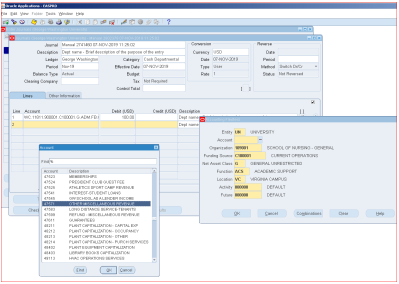
- Select the Natural Account from the drop down menu or enter the 5 digit account number for your intended revenue stream, then click “OK” and insert verbiage.

- Enter the monetary figure in the Credit Column.
- The journal description will auto populate, you may amend the information to be more specific.
- Tab to the flex Field the “Captured Information” box will pop up.
- Enter “US” Click on “OK” (If the checks are in foreign currency or written against a non-US bank, the check must be forwarded to the University Accounting Services Office for processing. No journal entry is required at this time).

- Add attachments to your journal entry.
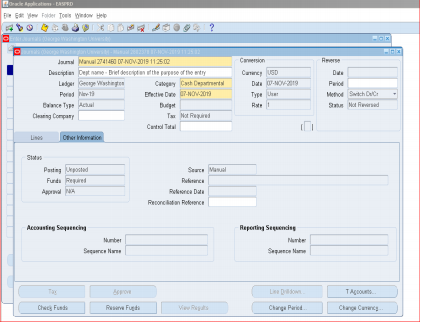
- Click on the “Other Information Tab”.

- The "Other Information Tab" is displayed in the below image.

- Click on the “Other Information Tab”.
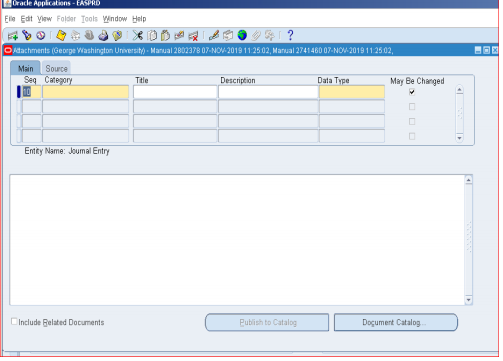
- Click on the “Paper Clip” in the blue tool bar.
- The attachments screen will populate.
- Sequence will auto populate for the First Line and continue in increments of 10 as more lines of attachments are entered.

- For Category type in J or Journal.
- Tab to Description – enter a brief description of the attachment such as “Backup” or the file name of your back up previously saved to your computer.
- Date type – “File”.
- Tab.
- The “Upload File” Pop Up will appear.

- Select Browse.
- Search to the appropriate directory on your computer, highlight your file and click on “Open".

- The Upload File browser will indicate the file path you input as the path to your saved document. If this is the correct path and file, click on “Submit”.

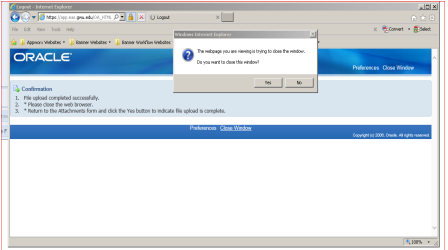
- You will receive a confirmation. Click on “Close Window”. Click on “OK”.

- You will be asked to confirm the closing of the window, select “Yes”.

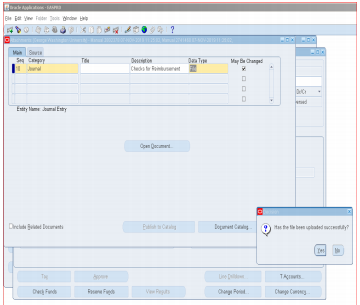
- Has the file been uploaded successfully? Click on “Yes”.

- Your file color will change from the grey background to black lettering on yellow background.

- You may click on “Open document” at this time to review your attachment for accuracy. Click on “Open".

- To complete your journal entry:
- Click on the X at the top right corner of your View Download page.
- Click on the X at the top right corner of your Attachment page.
- Click on the Lines tab to bring you back to your journal for finalization of your journal.

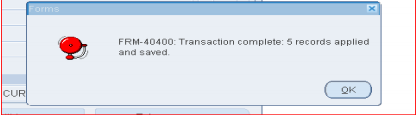
- Click on the “Check Funds”, if your debit column = credit column Click on “Yes”.

- Click on “OK” in the transaction complete and saved pop-up box.

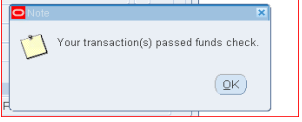
- Click on “OK” in the passed funds check confirmation pop-up box.

- Click on “Reserve Funds”, click on “OK”.

- Final Step - Click on the Approve tab. Click on “OK”, your journal entry will be forwarded to an approver in the University Accounting Services Office.